

To our IKE Customers and Community, Like all businesses, we are continuing to monitor and respond to COVID-19. Our focus at IKE is on the health and well-being of our people, their families, andRead More
If you have ever had a great day fielding poles you have experienced the mental bliss that comes from a successful day in the field. This joy, while not often acknowledged, is what truly drivesRead More


Your time is important to us. We will be following up with you soon.
Until then, here are some resources you might find useful:
Sincerely,
Team IKE
Telephone, Email, Morse Code, or Smoke Signal
 303-222-3218
  [email protected]
1-720-381-1634
[email protected]
3 October 2017
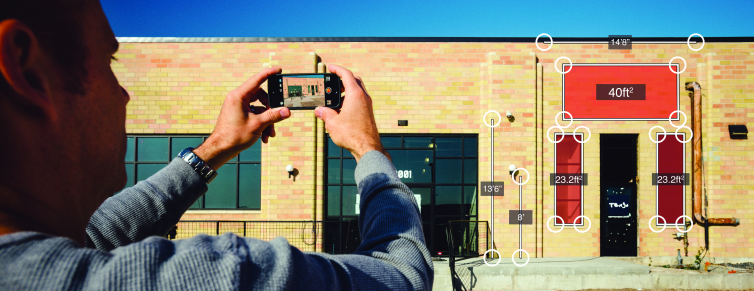
In speaking with Spike users at recent events and with partners, I’ve learned that the relatively new Point-to-Point Measurement feature on the Spike app is not as widely used or known about as the Photo Measurement tool. So, I want to make sure you are aware of this powerful tool and know how to leverage it on your signage projects.
Point-to-Point allows you to capture a linear measurement between any two points, such as the distance between the base and top of a pole or ground clearance to the side of a building. Unlike Photo Measure, Point-to-Point is not same-plane dependent and the two points can be horizontal or vertical to each other.
In my experience in the sign industry, one of the biggest use cases for the Point-to-Point tool is to measure setbacks. Each county has their own guidelines for permitting, and Spike makes the submission process that much easier by producing a photo record with the measurements included.
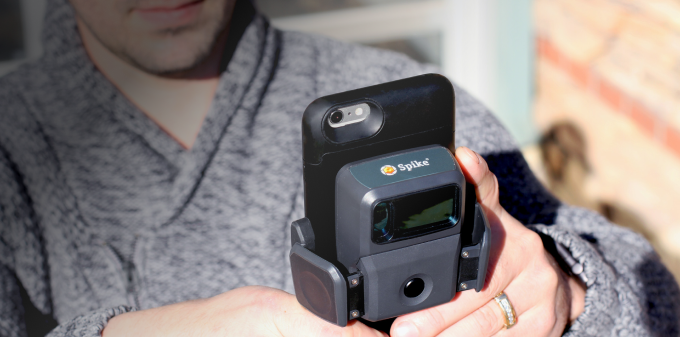
Before Spike, I would use a measuring wheel to collect my setback measurements, sometimes even having to stand in a dangerous roadway to do so. Using the wheel would never be as accurate as I needed it to be when the landscaping had uneven terrain or rocks. With Spike, now all I need to do is snap a photo of my proposed sign location and a photo of the county or city setback limit using my smartphone or tablet, Spike, and the Point-to-Point feature on my Spike app. My measurements are instantly calculated, and a photo record with data included can then be easily exported for inclusion in my permit application and plot plan.
In addition to calculating setbacks, Point-to-Point Measurements are also useful to determine the clearance between the side of a building and landscaping, the height of a light or flag pole, the correct-size ladder or boom truck to reach the top of a sign, access points for an installation team, or heights of a pylon sign. Point-to-Point Measurements allow you to work quickly and capture hard-to-reach measurements from a safe distance.
To take advantage of Point-to-Point, simply aim Spike at the first object, such as the side of a building, and take a photo. Then, keeping your feet planted, pivot to the second object, such as a tree, and take a second photo. Spike then calculates the distance between the two points, and unlike with Photo Measure, there is no need to complete the alignment rectangle step. For the best accuracy, keep the two targets within a 90-degree arc, and make sure you’re standing at least 20ft away and within 325ft of your objects.
You can also find detailed instructions on how to use the Point-to-Point tool in this article from our Spike Support Center.

For Ryan Cain, YESCO branch manager of the St. George, Utah office, conducting site surveys for signage work was traditionally an expensive process, … Continue reading "From the Signage Desk: Leveraging the Point-to-Point Tool"
Celebrating six years of ISA Membership, seven years serving the sign and graphics industry, and over 50,000Spike users worldwide! Get the most valuable … Continue reading "From the Signage Desk: Leveraging the Point-to-Point Tool"


Copyright © 2026 | ikeGPS.COM - All Rights Reserved.


 Connect
 Call
Call Support
 sign in
 IKE Value
  Meet our Team